Pages

Wednesday, November 30, 2022

Nautical Rope Basket Tray

 Coffee Table Rope Basket Tray

I’ve been wanting/needing a basket or tray on my coffee table to keep all our annoying remotes in one place.

As many others do, I started my shopping journey online at Pinterest and Etsy for inspiration and price shock! The prices weren't that bad, $25- $60 for the size I needed.

Before spending money, I decided to see if I could make something with supplies I had on hand.

Supplies for nautical rope basket tray decor


Materials:

  • oval wood plaque - 7 x 9 inches - Hobby Lobby

  • nautical rope - white rope in picture - 2 packages - Dollar Tree

  • Manila rope - brown rope in the picture above - Amazon

  • wood beads - 20 mm - Amazon

  • E6000 glue

  • glue sticks and glue gun

  • Waverly Antique Wax & Ivory Chalk Paint

Assembly:

  1. Glued four (4) 20 mm wood beads to the bottom of the oval wood plaque to serve as feet and give the basket height.

  2. Stained beads and bottom of oval wood plaque with Waverly Antique Wax, let dry.

  3. Painted top and sides of plaque with Waverly Chalk Paint - Ivory

  4. Light distressing of top with Waverly Antique Wax

  5. Hot glued nautical rope onto the oval wood plaque

    1. I started winding from the upper lip out, then layered the rope up until I ran out.

    2. I did my best to keep the sides/wall straight, even, and smooth so the finished product wouldn't look wobbly.

    3. once I reached the end of the first rope, I cut it and the joining rope at a 45-degree angle to glue them together

    4. Two packages of the nautical rope were enough to do five rounds on the oval wood plaque.

  6. I cut two pieces of the Manila rope to use as handles. Using a combination E6000 and hot glue I adhered the handles to both sides on the lower edge of the wood. E6000 gives a more permanent hold, and the hot glue gives a faster hold. My intention was to use a staple gun, but I was out of staples. 

  7. Lastly, I wound two layers of the Manila rope around the lower edge of the wood piece also covering the handles giving more support.

Finishing:

Voila - finished! It took a little over an hour and a half from start to finish. I had all the supplies in my stash and based on my calculations the cost was $6.50.

Budget Friendly Nautical Rope Basket DIY Home Decor


I added in the remotes and a few wicker balls!

Budget Friendly Nautical Rope Basket Tray DIY


What do you think? Easy…. cute?  Let me know!

Until next time … Happy crafting!


Wednesday, November 23, 2022

A Quilt For Jaxon

 My sweet grandson Jaxon turned two years old earlier this month.

Hubby and I flew to Houston so we could be there for the big event.


Grammie showing Jaxon his outdoor party decor!

party decor

His delicious birthday cake....


Mommy and Grandpa Pete....


More decor....


Jaxon ready to eat his yummy cake!


We gave him several new outfits for his birthday and one incredibly special quilt from Grammie!


The quilt block I used is the Wonky Star Block.  Each star block finished at 14 inches. I used scraps from a Dr. Seuss, bundle I had on hand.

Jaxon's room is gray with a blue accent, which is why I chose a blue faded denim cotton as the background fabric. I used Minky fabric as the backing, which also had a faded denim look.
They live in Texas and the minky is heavy, so I used flannel for the batting.

I love making wonky stars! I find them much easier to make than traditional stars. With the wonky star quilt block exact measurements aren't required, making it easy to "float" the star legs and not having to stress over losing your points!

Jaxon's quilt measures 48 x 78 inches and I love love the scrappy binding!


I'm ashamed to admit that I don't label my finished quilts, but I did make one for my sweet Jaxon's quilt.


I hope everyone has a wonderful Thanksgiving - eating tasty food, good drinks, watching football and especially being in the presence of those who make you feel special and loved 💕

Until next time.... happy crafting!


Tuesday, November 22, 2022

Fabric Scrap Gifts

 Got fabric Scraps?

I’m willing to bet if you’ve been sewing for a long time, chances are you have lots of scraps!

I don’t have the storage space I use to, so I donate scraps twice a year to a local group that sews for charity.

When possible, I try to make something practical and functional right after I finish a sewing project as I truly hate throwing things away that I can potentially upcycle or repurpose for another project.

A Gift for a friend...

My neighbor/friend has had some health issues recently, so I thought I’d make a little something for her.  She loves bright colors, and loves pillows and coasters as much as I do 😊


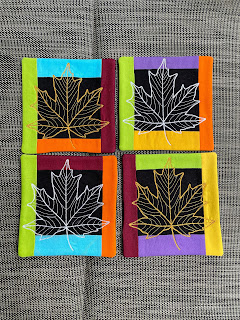
machine embroidered quilted fall coasters, mug rugs

improv log cabin quilted pillow with machine embroidery applique


The designs on both the pillow and coaster were machine embroidered. The fabric used was from Kona Cotton Solids scrap bag.

 The pumpkin heart design was purchased from Planet Applique. The lettering and leaves designs on the pillow came with my machine. The pillow design itself is an improv log cabin quilt block. The pillow finishes at 16 x 16 inches.

The rustic maple leaf design on the coasters was purchased from Embroidery Library. This was a quick stitch design. I was able to stitch the design and make the coasters in a little over an hour!


A Gift for Me...

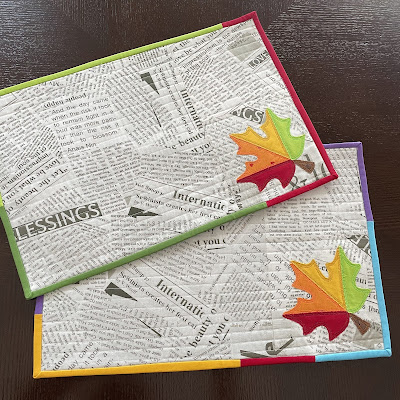
Many evenings hubby and I eat in front of the television with our plates on TV trays. I made a couple of placemats to use on the trays that complement our maple leaf table runner.

quilted modern fall placemats with embroidery


The maple leaf design was machine appliqued with my embroidery machine. The design was purchased from Embroidery Library, you can find it here. Don't you love scrappy bindings?

The text fabric used for the placemats is "Story" by Carrie Bloomston for Windham Fabrics. It's one of the fabrics that I deeply love and hoard to use as backing on some of my quilt projects.


Scrappy Work in Progress...

This time I pulled fabric from my batik stash.  Eventually I plan to put both panels into a tote bag.

string pieced scrappy maple leaf quilt block

batik scrappy string pieced quilt block


String piecing is another one of my favorite quilting techniques, I'll tell you more in a later post.


Until next time.... happy crafting!


Monday, November 21, 2022

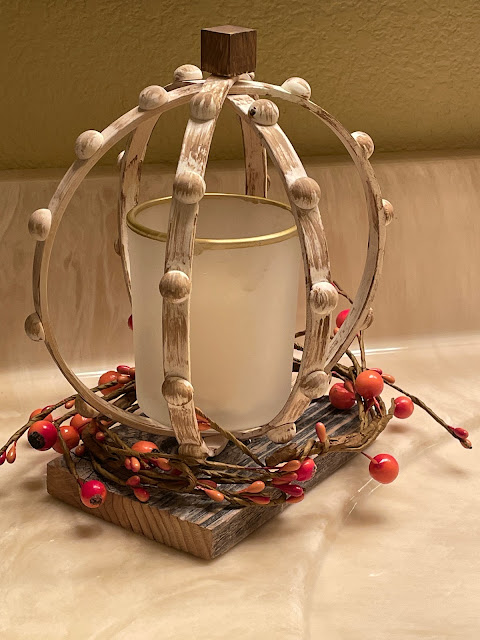
Farmhouse Beaded Pumpkin Fall Decor


Farmhouse Beaded Pumpkin Fall Decor

I found several wood pumpkin décor ideas online with great video instructions.

I decided to try it by adding my own spin. I knew I wanted something small to use in one of our guest bathrooms.


Materials

I grabbed the following supplies from my stash:

  • Set of 3 - 4-inch wooden embroidery hoops
  • half wood beads
  • Paint - Waverly Chalk Paint - antique wax and ivory
  • Wood cube (1 inch)
  • 3 x 5-inch scrap wood
  • glass candle holder
  • small LED candle
  • berry garland

·         

I only used the inside portion of each embroidery hoop for this décor piece.

Assembly

To get the pumpkin shape I inserted one of the hoops inside of another, which gives you an X shape. I then inserted the third hoop inside of the previous two hoops. It was a tight fit, so I didn’t think glue was necessary. Moving the hoops ever so gently gives the illusion of a round celestial pumpkin shape.

Once I was happy with the shape, I glued it to a 3 x 5-inch scrap wood base so that the pumpkin décor piece would stand on its own.


I only had thirty (30) of the small half wood beads available. I hot glued five beads to each of the six spindles, spacing them equally around the pumpkin.

When I make this beaded pumpkin again, I will use more half wood beads to give the pumpkin more definition and interest.

At this point I painted the pumpkin with Waverly’s chalk paint in Ivory with a light dry brushing using the antique Wax also from Waverly. I also painted a small wood cube from the Dollar tree using antique wax and then hot glued it to the pumpkin as a stem.

Finally, to decorate my wood pumpkin I added a small, frosted candle holder (also from the Dollar Tree) inside with a battery-operated LED candle with a timer. 

This wood pumpkin décor piece serves as a night light also! 

Lastly, I took a piece of berry garland from another project shaped into a circle and wrapped around the bottom.

I found this project to be lots of fun, super cute, budget friendly and best of all quick to make.

I hate to admit that I lost the photos I'd taken while making this. I didn't realize the syncing between phone and my computer had been disabled. 

I searched for an online video that might be helpful if you’d like to make one yourself.

Crafting My Best Life with Lisa Marie “Brillant Ways to UseDollar Tree Bamboo Hoops” on YouTube is similar to the one I made.

Is this a craft you’d make for your home or as a gift?  Let me know in the comments below.

Until next time …. happy crafting!

Sunday, November 20, 2022

Fall Quilted Pillow


Fall Quilted Pillow

I am constantly changing my home décor to celebrate the seasons. I tend to find ways to make those changes in a budget friendly way.

Using the fabric scraps from my maple leaf quilted coffee table runner I made this appliqued pumpkin trio fall pillow.

fall quilted pumpkin pillow with applique


I love the colors and how they complement the runner which is a terrific way to greet Autumn in our living room.

Machine embroidery is one of my creative passions.   The pumpkin trio design with the zig zag finish was purchased from HugABug Applique.  I used the 6 x 10 version of the design to create the 9 x 13 center panel of this pillow. 

My pillow finishes at 20 inches wide by 16 inches tall with an envelope style closure on the back. I did bind this pillow with the same fabric used for the pumpkin stems, the brown binding really gives the pillow a polished look.

Turning an embroidered panel into a pillow cushion is a great way to introduce yourself to home décor quilting. It allows you the ability to experiment with different fabrics, designs, and thread.

Do you enjoy making pillows?

Until next time happy crafting!

Maple Leaf Quilted Table Runner

 Maple Leaf Quilted Table Runner

Fall / Autumn is my favorite season. I love the warm hues of red, yellow, orange, and brown. 

We retired to Florida in 2017, but I miss the cooler temperatures on the east coast where I grew up and seeing the colorful falling leaves as we walked through the parks or attended fall festivals. To honor those memories, I make some sort of maple leaf décor for my home each year.

This year I made a quilted table runner.


You can find the free maple leaf quilt block pattern from FatQuarter Shop as part of their classic and vintage series. The maple leaf quilt block is quite easy and beginner friendly. The Fat Quarter Shop pattern and video are well done and extremely helpful.

I used a newspaper print fabric for the background and a small fall colored Grunge Seeing Stars fat quarter bundle by Basic Grey for Moda Fabrics, as the leaf fabric.

I made four maple leaf quilt blocks for my runner, rotating and offsetting them to resemble falling leaves on newspaper. The finished table runner measures 16 x 40 inches.

I love the finished runner and it looks great on our coffee table.


Prefer table topper instead?  Fat quarter shop has you covered there also with another great simple and free pattern you can find here. I made this 23 x 23-inch topper for a smaller table, this time using Grunge Hits the Spot Metallic fabric for the leaves.


If you are thinking about what fall design you should do next, definitely try this lovely quilt block! The maple leaf block is one the classics in the quilting world, you can make several for an entire quilt, 3 or 4 as a table runner as I did or just one to use as a hot pad or trivet.

Let me know what you think in the comments below. Do you see the maple leaf quilt block in your future? Or are you a seasoned pro with this classic quilt block?

Until next time…. happy crafting!


Welcome to The Crafty Grammie


Welcome

Hi friend and thanks for visiting my blog – The Crafty Grammie!

My name is Karla and this my piece of the World Wide Web where I share my crafting and sewing adventures and hopefully offer some inspiration along the way.

Grab a drink, sit back, and enjoy!

Back to Top