Hi there - happy Thursday!
You can never be too early to start working on Christmas projects! One of my 2023 goals is learning how to use my Cricut cutting machine other than decorating tee shirts.
The decor, gifts and holiday trinkets that can be created with a cutting machine is endless.
Sometimes I have a bad habit of watching endless videos or reading posts on "how to do" something to the point of information overload, which leaves me feeling lost or unsure of what to do first or next.
Today I want to share a few Christmas items I've made over the past few weeks. I keep a Cricut Joy and mini heat press at my daughter's home when I travel to Texas so I can craft while babysitting.
Most of the projects are dupes from items I saw online shopping.
Santa Believe - Reverse Canvas Wood Sign
The inspiration for this project came from Melissa Mortenson of Pink Polka Dot Chair. She offers a complete tutorial for a wood sign. I liked her wood sign but chose a different technique to make my 10 x 20 inch personalized sign. I used a combination of permanent and heat transfer vinyl for the lettering and Santa face design.
Paint Stick Christmas Tree
I saw this wood Christmas tree decor piece in several places last year while shopping. It wasn't expensive but I knew I could re-create it.
I purchased a package of one gallon paint sticks from Loews. There is 9 inches of wood before the handle on each paint stick.
Keeping the 9 inch measurement in mind I sketched out a design. With my trusty miter box and saw I cut three paint sticks into the following dimensions
- 2 & 7 inches
- 3 & 6 inches
- 4 & 5 inches
I cut the handle off one of the remaining paint sticks to use as the tree spine. Using wood glue I added the cut pieces onto the tree spine in size order. My son-in-law had some scrap wood in the garage and I used that for the base. I then painted the branches and base with acrylic paints my daughter had on hand. I keep a Ziploc bag of scrap vinyl in the closet which was perfect for this project -- I needed one inch in width pieces for the words. I hot glued greenery and berries for embellishments.
All in all this was a $2 project, granted it is a smaller than the one sold in stores. Using 5 gallon paint sticks would have made a larger tree. The smaller size is perfect for my desk.
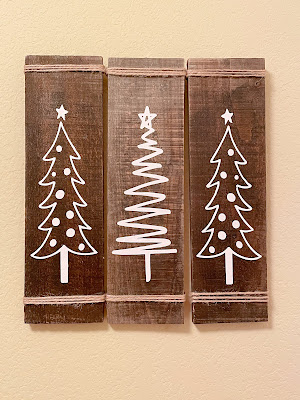
Rustic Christmas Tree
This type of wooden Christmas tree decor has been popular the past couple of years. They are beautiful, but too large for my home and out of my price range.
I purchased a bundle of reclaimed wood planks on Amazon to make a set of rustic trees for our home. The common thread of all the listings on Etsy was "hand painted". Freehand drawing is not my thing so I used the Cricut Design Space software and created stencils so I could achieve the hand painted look.
I am so thrilled with the results! Several of the videos I'd watched recommended using Mod Podge before adding the stencil paint to prevent bleeding...it worked for me!
Personalized Wood Ornament
One can cut craft wood shapes using a Cricut machine. I have a Cricut Maker and cut out the letter G to make a personalized ornament. I've heard that the Cricut Maker 3 cuts faster and neater.
Jennifer Maker is one of my favorite Cricut instructors, she's very thorough and crafty!
After watching Jennifer's wood cutting video I made this:
I stained the wood first, taped off the area for the black paint, the green plaid is vinyl. I used the vinyl instead of scrapbook paper or fabric as an applique medium.
Nativity Wood Block and Cutting Board
Wood decor pieces showcasing the Nativity Scene are popular items available for sale.
I painted one of the reclaimed wood planks with black chalk paint and added the white nativity scene as a stencil.
I painted the mini cutting board with the same black chalk paint but added the mini nativity scene using heat transferred vinyl (htv).
Metal Stocking Ornament Decor
This last project was all about me testing Dollar Tree vinyl. The cost was $1.25 per roll which is unbelievably fantastic the quality was the issue for me.
I found the vinyl to be thin. I covered the metal stocking with the Dollar Tree vinyl and wasn't very impressed. I decided to use my scrap vinyl for the lettering and the heart. At this point I still haven't tried the Dollar Tree vinyl in my Cricut and not sure that I will, I think using it for applique projects will be good enough for me.
Each project shown today didn't take much time and the material cost was minimal. Once I return home I'll make them a second time to see if they make the cut for my fall festival booth.
Until next time....happy crafting!


