Pages

Thursday, August 31, 2023

Fall Rustic/Farmhouse Ideas with Cricut Stencil

 Hello there and happy Thursday!

Today I am sharing three fall projects I recently completed using my Cricut cutting machines.

Farmhouse Fall Wood Sign

The next technique on my list to try was making stencils.  My go to source for all things Cricut is Jennifer Maker.  She offers both video and written tutorials.  I really appreciate her step by step teaching style.

Repurposing an old 10 x 20 wood frame and foam board I was able to make this simple wood sign. I found the welcome fall design on the Cricut Design Space software. It is free if you have a membership account. I used Cricut brand removable vinyl and acrylic paint to create the stencil.

Fall Farmhouse Wood Sign with Cricut Stencil


Rustic Wood Coasters

I made this set of 6 gorgeous rustic wood coasters using stencils I created with my Cricut Joy.

Rustic Farmhouse Wood Coasters using Cricut Stencil


I was able to shop my craft stash for the supplies I used. While visiting my son's family in Indiana I grabbed lots of fallen tree branches for crafting, they were perfect for this project. 

 I used Cricut brand premium vinyl and chalk paint to create the stencils. The designs also came from Cricut Design Space. Once the coasters were finished I did seal them and added cork rounds on the back for additional furniture protection.

I'm so in love with how these coasters turned out! I stained and decorated a Dollar Tree mini crate to serve as a holder for the coasters.

Wood Coaster Tray


Reclaimed Wood Serving Tray Décor

I'm hoping to make personalized wood trays as presents for the kids this year and had to practice by making one for myself!

Reclaimed Wood Serving Tray Decor - Cricut Stencil


During Amazon Prime I purchased a couple of reclaimed 12 piece wood bundles. Each plank in the bundle measures 3.5 x 12 inches, and I used 5 planks to make one tray.

I glued three planks together using Gorilla Ultimate Waterproof glue to form the center panel. Trimmed two more planks down to form the side pieces and glued them to the center panel.

Once the glue was dry I drilled holes for the handles and stained the entire piece with Minwax Stain in Ebony.

I purchased the handles from Lowe's for $.97, they were originally black so I painted them with a metallic gold acrylic paint. Once the paint was dry I screwed them into the tray.

Again I used a design from Cricut Design Space, since it was larger I had to use my Maker machine to cut it. This time I tried the Cricut brand stencil vinyl, the metallic gold acrylic paint and white chalk paint to create the stencil.

I love how the tray turned out and I made a few mini wooden pumpkins using Dollar Tree tumbling tower blocks to complement the tray.

Wooden tumbling tower pumpins


Until next time....craft the life you love❣


Tuesday, August 29, 2023

Quilting For Fall - Part 2

Hello there and happy Tuesday!

Today's post is a continuation of my Quilted Table Runner post from last week.

In this post I'm sharing two fall table toppers and 4 mini quilts - recent finishes I made for the shop.

Fall Table Toppers

Autumn Star

Quilted Fall Table Topper- Star Mini Quilt


This quilted table topper was inspired by the Autumn Star tutorial over at Seasoned Homemaker.

Her version of the Ohio Star Quilt Block focuses on half square triangles and squares, I opted to use flying geese quilt blocks to form the hourglass portion of the star, I also included a machine embroidered sunflower design to the center block.

My Autumn Star table topper/mini quilt measures 24 x 24 inches, I used fabrics from Corey Yoder's Cozy Up collection for Moda Fabrics.

Log Cabin Fall Mini Quilt/Table Topper

Curvy Log Cabin Fall Mini Quilt/Table Topper

I love the copper colored and gold etched leaves fabric from my stash used for this mini quilt. The center portion is made with 4 curvy log cabin quilt blocks.  I arranged the narrow strips towards the center creating space for the machine embroidered cottonwood leaf design. This mini quilt measures 22 x 22 inches.

Hello Fall Mini Quilt

Hello Fall Mini Quilt with embroidery


Even with the best intentions some of my projects don't turn out how I envisioned. This 9 x 15 Hello Fall mini quilt is a good example! The sketched pumpkin design from Embroidery Library stitched out beautifully, I'm just not loving the final product.

Rustic Fall Mini Quilt 1

Fall Mini Quilt with applique, Pumpkin Give Thanks


This Give Thanks pumpkin machine appliqued mini quilt measures 8 x 10 inches and turned out great! I used scraps from Sandy Gervais' Give Thanks fabric collection.

Fall Rustic Mini Quilt 2

Fall Mini Quilt Wall Decor - Country Wall Art


When I saw this fall country scene embroidery design it reminded of a quilt pattern that I saw in a Fons & Porter magazine several years ago. Again I used scraps from Sandy Gervais, Give Thanks fabric collection.  I created the text portion of the design to match the quilt pattern I'd seen before.  This mini quilt measures 13 x 15 inches.

Grateful Thankful Blessed Mini Quilt

Grateful thankful blessed fall mini quilt


This 10 x 16 mini quilt is the last finish for today. I used scraps from Corey Yoder's Cozy Up fabric collection.  I love the simplicity of the embroidery design, the lace and wood heart button.

Check back for the next installments of my 2023 fall creations!

Until next time craft the life you love❣


Friday, August 25, 2023

Simple Wood Pocket DIY Organizer

 Hello there and happy Friday!

Dollar Tree DIY Wall Storage Decor

Some days I feel like I spend most of my free time trolling the internet for inspiration.

Thankfully, I'm rarely disappointed getting inspired!

Wood wall pocket organizer


I saw the above wood ensemble and decided it would be my DrEAMi (drop everything and make it) project for August! I didn't need three so I decided to try and make my own version of the middle organizer.

I went to Dollar Tree to get supplies:

Keep in mind all Dollar Tree products are not made consistently, try to pick 3 wood rounds that line up as close to perfect as possible!

Assembly steps:

  1. Dollar tree wood rounds are thin so I glued two together - aligning the holes in the top
  2. Cut the third round in half - glue the halves together
  3. Glued one wood cube 1/4 inch down from the halfway point on the whole wood round on both ends
  4. Measured and trimmed the jute rope to fit between the wood cubes
  5. Glued rope in place - stacking rope onto rope until I reached the height of the cubes - mine was 4 layers deep - making sure the curves of the rope align with the bottom of the wood round
    Wood Pocket Organizer DIY

  6. Painted all pieces, wood and rope with Waverly's Antique Wax - let dry
  7. Glued the wood halves onto the whole wood round 
  8. When gluing I made sure to align the half wood to the cubes on top and the rope on bottom
  9. Added small nails on the end portion of the half wood to ensure the bond to the cubes was strong and secure
  10. Created a beaded hanger with twine - threaded the hanger through existing holes
I could see the small nail heads on the front so I added the trim of lace. I could have added more antique wax but felt that might make it super noticeable.

I was feeling so pleased with my efforts I added a vinyl decal saying "You Totally Got This"!

Wood Pocket Organizer - Cricut Wood Idea


I'm currently using the wood pocket organizer to store my printed open orders.

Dollar Tree Wood DIY Decor


Until next time craft the life you love❣


Thursday, August 24, 2023

Quilted Table Runners for Fall

 Hello there and happy Thursday!

Anticipating Autumn

The gorgeous colors of fall is just around the corner, feeling that anticipation my sewing machine has been humming along!

Table runners are my favorite quilt project to make to give as a gift or sell in my shop. Quilted runners can provide an easy way to dress up a table for special occasion by adding a decorative touch or just for everyday use.

With the change of seasons approaching I have three fall themed table runner finishes to share.

QAYG Jelly Roll Fall Table Runner

Quilt As You Go - (QAYG) method combines both the piecing and the quilting steps into one.

QAYG Runner #1

QAYG Fall Quilted Table Runner with embroidery


I loosely followed this Fat Quarter Shop video tutorial because I wanted to add a machine embroidered applique design to the runner.

I pieced the jelly rolls strips onto the batting - no backing. Once the strips had been sewn on I added the trio pumpkin embroidery design to each end of the runner, then added backing fabric with additional echo quilting along the seams. Lastly, I added binding.

This runner measures 13 x 38 inches and the fabric is from the Flower Pot collection by Lella Boutique for Moda Fabrics.

QAYG Runner # 2

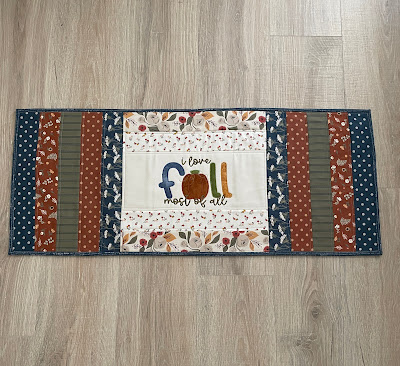
Still using Jelly Roll strips I used an alternative layout to accommodate another fall embroidery design.

Using the same Flower Pot fabric collection Jelly Roll I created this 14 x 31 inch table runner with the "I Love Fall most of all" embroidery design in the center panel.

Fall Quilted Table Runner with Embroidery


Hello Pumpkin Fall Table Runner

Fall Quilted Table Runner Hello Pumpkin Embroidery


This fall table runner measures 17 x 31 inches and features the beautiful fabrics from the Cozy Up collection by Corey Yoder for Moda Fabrics.

Last Christmas I was gifted several of the Fat Quarter Shop's foundation paper piecing sets and  used the 2x4 flying geese papers for this super scrappy runner.

I was super impressed with the foundation papers! The flying geese are perfect, the instructions included on the pad were very clear and the fabric waste was very minimal.

The saw tooth star corner blocks have small flying geese elements so I used my Creative Grids Ultimate Flying Geese Ruler to create them. I especially like using this ruler because you can make 4 at a time flying geese over-sized and then use the tool to trim to perfection. The "Hello Pumpkin" embroidery design in the center panel can be found here.

I'll have more to share with you soon...

Until next time craft the life you love❣


Tuesday, August 22, 2023

Cutting Board Craft Ideas

Hello there and happy Tuesday!

Creative Uses for Cutting Boards

I'm always searching online for great gift ideas, one of the blogs I follow, The Crazy Craft Lady, did a post on Dollar Store Cutting Board Crafts that included several projects that got my creative juices flowing!

We will be traveling during the upcoming holiday season so I need to get my gifts made early.

I didn't have wooden cutting boards in my stash so I ordered several 6 inch with handle cutting boards from Woodpeckers and several mini 3.5 inch boards from Amazon.

Christmas Cutting Board Decor

Mini Cutting Board Christmas Cricut Joy Idea


I used Waverly's Ink chalk paint on the mini cutting boards and added a nativity design, using HTV (heat transferred vinyl) I cut using my Cricut Joy. I chose to use the HTV so that I would be able to test it on wood with my new Cricut Mini Press.

I'm really impressed with this mini iron - I plan to use it pressing seams in my quilt projects!

Wood Cutting Board Christmas Decor


I applied Early American Minwax stain on the 6 inch larger cutting boards, again adding a nativity scene, but these were wood cutouts I purchased from Hobby Lobby.

I painted the Nativity cutout with the same black chalk paint. Using a combination of E6000 and Gorilla hot glue on the back I was able to adhere it to the bottom of the stained cutting board. I also painted and distressed a metal JOY sign from my stash and glued it to the top of the cutting board.

I then sprayed both cutting boards with minwax polycrylic to seal them before adding the decorations.

Multipurpose Farmhouse Storage Crate

I've seen this craft several times online and YouTube and knew I wanted to make one for myself.

I was able to pull the basic items needed from my craft stash:


Using the inspiration and tips from each of the videos and blog posts read, I did my own thing constructing the caddie, including adding nails to secure the frames to the cutting board and nails to secure the craft sticks that form the bottom of the crate.

Dollar Tree Farmhouse Crate DIY


I used vinyl from Hobby Lobby to cover the sides and ends of the crate for decoration. I still need to cut the dowel to size and arrange the flowers, which are in mason jars.

Dollar Tree Storage Crate DIY


I love that I can either use the crate to display greenery and flowers or as way to store my craft supplies. It's very sturdy and quite functional.

Tablet Holder

Recipe/Tablet Holder DIY


I turned one of my 6 in wooden cutting boards into a recipe/tablet holder.  The embroidery panel can be swapped out easily. I used Velcro to secure the fabric to the cutting board.  The buttons are hiding the Velcro. 

I used actual Jenga Block game pieces and paint sticks to create the hardware enabling the tablet holder to stand.

I hope that this post has given you some inspiration to do a little research on cutting boards crafts and decor so that you will give it a try! I am always happy when I make a vision or sketch come to life!

Until next time create the life you love ❣


Tuesday, August 15, 2023

Quilted Kitchen Gift Ideas

Hello, and happy Tuesday!

I have a couple of finishes to share with you today that would make great kitchen gifts!

Casserole Hot Pad

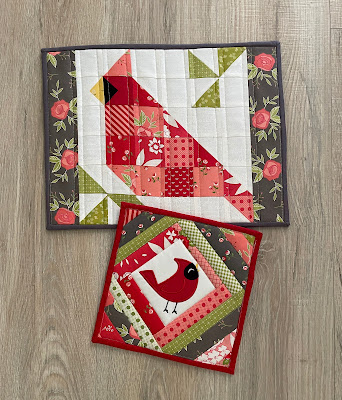
One of my wonderful customers wrote and asked if I would/could create a gift for her sister's birthday.  She requested a kitchen item featuring cardinals.

I decided to make a casserole hot pad and matching potholder gift set.

Casserole hot pads are extra large trivets that look great on your table and protect the table's surface.

I really enjoy making casserole hot pads because they are great scrap busters.

Quilted Casserole Hot Pad - Scrap Buster


For this version I used Carol Thelen's video tutorial to create the beautiful cardinal patchwork. I used red and pink scraps from the Moda designers Lella Boutique, Sherri & Chelsi, and Camille Rosekelley.

The cardinal quilt block finishes at 12 x 12 inches, I added borders (2.5 x 12.5) on the sides to get a 12 x 16 finished size for the casserole hot pad.  Perfect for a 9 x 13 casserole dish.

For the inside I used a layer of cotton batting and two layers on Insul-Brite, which made it super thick.  Next time I think 1 layer of Insul-Brite should be plenty.

The matching potholder was made using a QAYG (quilt as you go) method with the machine embroidered cardinal as the center piece.

If I do say so myself I think this gift set is stunning...I love how it turned out!

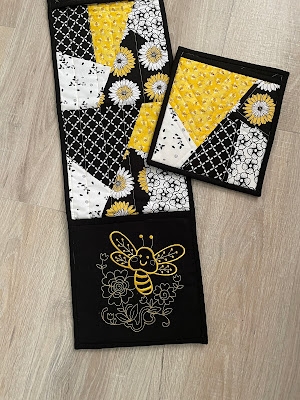
Crazy Patch Double Pocket Oven Mitt

This kitchen set is a gift for my daughter.

Crazy Patch Quilted Double Pocket Oven Mit


I used the Crazy Quilt Paper by Lori Holt for 10 inch stackers or layer cakes to create the crazy quilt blocks.

Since black and yellow fabrics were popular this year I shopped my stash and pulled 5 fat quarters in those colors for this project.

I cut one 10 x 10 square from each fat quarter and stacked them together right side up. The crazy quilt paper has a wax side that I iron onto the stack and cut ( yes I cheated and cut 5 squares from one sheet!)

I was able to make 5 unique crazy quilt blocks from the one cut.

I used 4 of the crazy quilt blocks to make the double pocket oven mitt and the 5th block to make the matching pocket potholder.

Kitchen Gift Set Quilted Bumble Bee Embroidery


The bumble bee doodle embroidery on the pocket can be found here.

Until next time...craft the life you love ❣

Thursday, August 3, 2023

Fall Quilted Table Runners

 Hello, and happy Thursday!

Today, I am sharing two more table runner finishes.

Rustic Pumpkin Table Runner

I saw this really cute mini quilt online. I loved how she incorporated flying geese into her pumpkin design.   The designer didn't give any dimensions so I challenged myself to create my own version for the shop.

This fall table runner measures 17 x 41 inches. Featuring rustic shades of rust, yellow, and orange fabrics from the Give Thanks collection by Sandy Gervais for Riley Blake.

It was fun to see my sketch come to life.  The center of each pumpkin are flying geese quilt blocks, I have them looking up reminding me that blessings come from above.

I added the "Give Thanks" embroidery design over the smaller pumpkin to add a little extra design element.


Sentimental Patchwork Pumpkin Topper

I'm always looking for ways to incorporate machine embroidery into my projects.

This simple heartwarming table topper was able to fulfill that need.

Topper measures 20 x 20 inches.

The patchwork of vintage prints from the Farmhouse Collection by Fig Tree Quilts for Moda, surrounds a machine embroidered pumpkin with the text, blessed, grateful and thankful.


Until next time, craft the life you love❣


Back to Top